recipes
Old-school cakes: Sock-It-To-Me and 7-Up pound cakes
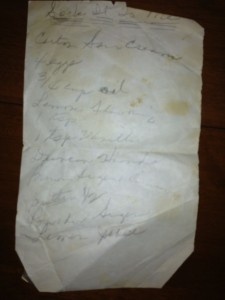
At last weekend’s Denton Blues Festival one vendor was selling Sock-It-To-Me cake and I was reminded of reams of recipes Regina had for cakes.
There were so many we didn’t take the time to talk about all of them, but occasionally one would capture Regina or Patti’s imagination. Regina said Sock-It-To-Me was so good.
Regina must have made Sock-It-To-Me cake a lot, because this was her recipe.
(You might be better served finding a recipe elsewhere. I’m told it’s often printed on the box of Duncan Hines cake mix, the way that the recipe for Rice Krispies squares is usually on the cereal box. But I also have seen from-scratch recipes for it on baking blogs, too.)
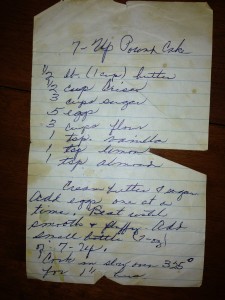
When we found the 7-Up pound cake recipe, Patti said it was good, but she wasn’t making it anymore because she couldn’t find 7-Up in the store. “And don’t make it with Sprite. I tried. It’s TERRIBLE,” Patti said.
Regina said she gets 7-Up at the dollar store all the time.
I bake cakes from scratch, because cakes from mixes taste waxy to me. Many of Regina’s recipes are from scratch, but not all. My sister, Karen, and I wondered aloud if anyone who cooks seriously still cooks that way (clearly they do, there’s a quarter of grocery aisle committed to cake and frosting mixes). I think it’s interesting that to Regina’s way in the kitchen, if it was a good recipe, it survived. I don’t remember any cake she served ever tasting waxy.
Next week we’ll get back to DIY for the pantry.
DIY recipes: Salami
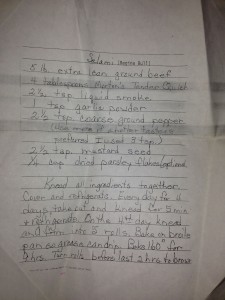
When we pulled this recipe from Aunt Regina’s files, everyone got excited because this was a really popular recipe with the family. But, as Aunt Regina says, “You really get into a job when you make that.”
Williams-Sonoma carries pink curing salt, but I’m not sure it’s any different than the Morton Tender-Quick her recipe calls for. All pink cures have the same concentration of sodium nitrite, 6.25 percent, the meat guys say.
DIY recipes for the pantry: Barbecue sauce
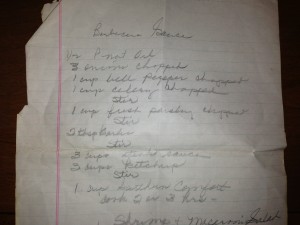
Oh, Aunt Regina. You had me at Southern Comfort.
Barbecue Sauce
1/2 cup peanut oil
3 onions, chopped
1 cup bell pepper, chopped
1 cup celery, choppedStir.
1 cup fresh parsley, chopped
Stir.
2 tablespoons garlic
Stir.
3 cups steak sauce
3 cups ketchupStir.
1 cup Southern Comfort
Cook two to three hours.
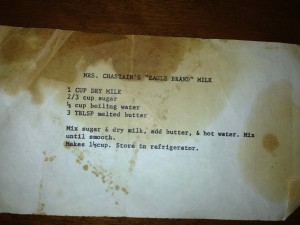
DIY recipes for the pantry: sweetened condensed milk
Continuing in the series of DIY recipes we found in Aunt Regina’s collection. Sweetened condensed milk, for those times you want to keep your pledge to not cook from a can.
DIY recipes for the pantry: Hot sauce
I spent the day today with Mark’s Aunt Regina and his stepmom, Patti, at Regina’s house outside Kilgore. Patti had been telling me that the cookbook and recipe collection stuffed in the cupboard above Regina’s refrigerator was a treasure, and she was right.
We set aside two accordion files to go through today, hunting specifically for things Regina, or her mother (that would be my children’s great-grandmother), or Patti had written down. I ended up capturing more than 240 images this afternoon. And occasionally taking notes.
Sometimes Regina just had a list of ingredients and the barest of instructions. We talked through it all, to make sure we knew what we were hanging on to and what we were tossing.
I noticed, as I’ve often seen with older recipes, that most of them were quite simple. Regina clipped and saved a lot of recipes, but you could tell by the splatters which ones she used. Patti asked about one that had long instructions. “Did you make this?” she asked. “Oh, no!” Regina said. “When it takes two pages of instructions, no, I didn’t make it.”
I was the most excited to see some of her DIY recipes — salami and ravioli and brisket and hot sauce (below) and sweetened, condensed milk, “for those times when you can’t find it,” Regina said. There’s never been a time that there wasn’t sweetened condensed milk, even the nonfat variety, at the store when I wanted it for a recipe. But Regina is 91, with a life experience that transcends the Great Depression and several wars. That just gave me pause, thinking how much life can change.
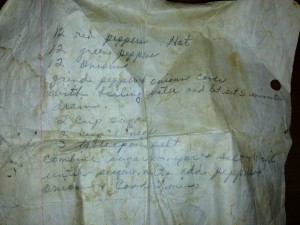
We’ll start with the hot sauce. “It’s hot. You have to use gloves,” Regina says.
Hot Sauce
12 red peppers
12 green peppers
12 onions
Grind peppers and onions. Cover with boiling water and let set 5 minutes. Drain.2 cup sugar
2 cup vinegar
3 tablespoons salt
Combine sugar, vinegar and salt. Boil until sugar melts. Add peppers and onions. Cook 5 minutes.
Making your own way: Baked Oatmeal
I’ve racked up a lot of miles traveling to Iowa City and back the past two years. One small thing that’s always made it more pleasant was knowing at the end of the trip was a house on the hill with a comfy bed and fluffy towels and, in the morning, super-smooth coffee and an exceptionally good breakfast.
The house has the tiniest driveway I’ve ever had to maneuver my pickup into. I never would get there before sundown, but that was ok, because Ray and Shirley installed a motion-sensitive light to help out. The squeeze was totally worth it for another reason: the house was only a few blocks, walking distance, from the dorms where Paige lived at the University of Iowa for the past two years.
This year, we arrived for the fall semester with a new project: moving Paige into her first apartment. The morning of, I laced up the shoes and went for a morning run along the river, another pleasant part of the routine, and returned to see something I hadn’t noticed the night before. A big “for sale” sign in the front yard.
Bummer. Even innkeepers need to retire.
I’m glad I picked up their recipe book, so if I get a hankering for the way Shirley made eggs (they were never just eggs), I can do it on my own.
What was likely our last stay, though, she made baked oatmeal to accommodate a guest with dietary restrictions. I asked her to send the recipe to me, since it wasn’t in the cookbook, and then promptly adapted it to what I had in the house. It turned out terrific.
Baked Oatmeal
1 cup hazelnuts
1 cup Irish, steel-cut oats
1 large egg
1 cup fresh figs, cut bite-sized (you can substitute apples and raisins)
1/4 cup milk
1/2 cup brown sugar
1/4 cup canola oil
1 tsp. baking powder
1/2 tsp. salt
1/4 tsp. cinnamon
Toast hazelnuts in a 350 oven for 10-15 minutes until brown, wrap in kitchen towel to cool, rub skins off and set aside.
Bring 4 cups of water to boil, add oats and cook until soft, about 30 minutes. Let cool about 10 minutes. Combine egg, brown sugar, milk, oil, baking power, salt and cinnamon; fold in figs and then stir into oats. Spoon mixture into a greased loaf pan, cover and refrigerate overnight.
Remove from the refrigerator 30 minutes before baking. Preheat oven to 350 and then bake the loaf 50-60 minutes until knife inserted in center comes out clean. Cut into squares, top with a handful of hazelnuts and serve with a small amount of milk poured over the top.
Venison steaks
Another favorite venison recipe, as promised, from Chili, two ways.
The first thing Mark often cooked after a successful hunting trip was the venison backstrap, or tenderloin. I know some people soak the meat in buttermilk or wine to smooth out any gaminess that might be in the meat, but Mark rarely did that.
Instead, he would cut the meat on the diagonal into small medallions and dredge them in flour that was seasoned with salt and pepper, fry it in a bit of cooking oil and then serve it up with mustard. Pretty delicious, just like that.
Sometime ago, I stumbled across a recipe that took advantage of the little bits left behind in the fry pan that made a nice sauce, and that’s the way we’ve served it since.
If you want to make the sauce, choose a cast-iron pan and olive oil for frying the venison — a scant tablespoon per pound of meat. After removing the meat from the fry pan (keep it warm on a platter nearby), pour about a 1/2 cup of stock into the pan to pull up all the bits. With the heat on very low (so you don’t curdle the sauce), add a teaspoon each of dijon mustard and horseradish, and 2 tablespoons of Greek-style yogurt. When it’s hot, plate the steaks and pour the sauce over.
Chili, two ways
Up north, we made chili with tomatoes, kidney beans and very little beef.
I know. The horror.
When I came down to Denton to go to college, my roommate, Terri, a San Antonio native, and I would make chili with buttermilk biscuits from her recipes. Another roommate, Charlene, a Houston native, would dump her chili over Fritos and put chopped onions and grated cheddar cheese on top.
Over time, the family recipe for chili has evolved based on what I learned from my roommates. When the boys were teens, Mark would head to the ranch near El Dorado each year during deer season so we could stuff the freezer with enough venison to get us through a year of hamburgers and chili. (I’ll share the recipe for my favorite, venison medallions, soon.)
Chili is going to be on the stove tomorrow night, after the kids scored some ground bison during a shopping trip this weekend. Sam won’t eat it. We’ll have to make him a bison patty on the side.
I know. The horror.
Quick Red-Meat Chili
1 large, or two medium, onion, chopped
2 T. chili powder (Penzey’s is best)
1 1/2 lb. of ground beef, bison, or venison
1 can of Ranch Style Beans (Want more beans? Use the big can. Don’t want to cook from a can? Prepare this recipe from Homesick Texan, using 4-6 cups in the chili.)
Saute the onions in enough olive oil to coat the bottom of a deep cast-iron skillet until they are very, very soft. Add the chili powder and saute another 1-2 minutes, until the spices are very fragrant. Add the meat and brown. Drain any excess fat. Stir in beans and heat through until bubbling, then serve.
Variation: For turkey chili, substitute 2 lb. of ground turkey and also add a pint jar of canned tomatoes when you add the beans. The tomatoes give the turkey chili more complex flavor and body.
Sam’s Peanut-butter lover ice cream
He came up with this combination himself. The recipe is loosely based on Ben and Jerry’s cookbook, published the year he was born and gifted to us by dear friends, Jan and Tracy Davis.
Peanut Butter Cookies n’ Cream
 3 cups broken up peanut butter Oreos
2 eggs
3/4 cup sugar
1/3 cup crunchy peanut butter
2 cups cream
1 cup milk
1 tsp. vanilla
Set the cookie bits in the freezer to chill them while you prepare the mix. Beat eggs and add sugar slowly, combining well. Whisk in peanut butter and when well combined add cream, milk, vanilla. Freeze in ice cream freezer according to manufacturer’s direction, adding cookies at the end and blending 1-2 more minutes.
Rainbow toast and sunshine strawberry jam
Sam limited his food choices when he was in elementary and middle school. Sometimes we took action, but otherwise we tried to keep a good humor about it.
I can remember taking the kids out for breakfast, usually when we were on the road, and as the rest of us were all scarfing down pancakes and eggs and grits and bacon and sausage, Sam would be opening a fun pack of cereal and spreading jam on an order of dry toast.
He expanded his food universe by trying all different kinds of jam. He settled into a routine where he would spread each piece of toast with all the jams at the table equally. Sometimes that could be four or five different flavors. When that happened, he called it rainbow toast.
Some of those pieces of toast became real works of art, kind of like that cool stuff baristas can do designing hearts or flowers or conifer trees in the foamy milk in your coffee.
He doesn’t do that anymore, but he hasn’t lost his appreciation for a good jelly or jam.
For a long time, I just made the classics, like grape and blueberry. Lately, I’ve been trying new combinations, like strawberry-rhubarb with ginger, and apple-tequila. He likes them for the most part. The prickly pear jelly was a bust, as far as he was concerned, and he doesn’t like the butters — so things I can do with figs and pears, he just passes on.
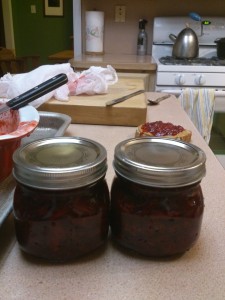
Today, we finished the “sunshine” strawberry jam. I got the recipe from Jamison and Jamison’s “A Real American Breakfast.” This is not a recipe where the list of ingredients tells you much. You have to read what they tell you. It’s an old recipe. I’d been wanting to make it for a very long time, even before I wrote this story.
After the first day in the sun, Sam said, “It smells great.” After the third day, Sam said the flavor was intense.
Yep. Sunshine in a jar. Rainbows on your toast. This recipe is going in the regular rotation.
UPDATE:
Because Tom Reedy wants the recipe:
2 pounds strawberries
2 to 3 cups sugar
2 to 3 tablespoons fresh lemon juice
Make sure you and your utensils are scrupulously clean. Discard berries that are bruised or otherwise ailing. Stem the berries and halve them, cutting out any cottony white cores. This can easily eliminate 1/2 pound of the berries. Weigh the berries and combine them with 3/4 cup sugar per 1/2 pound of berries. (Really, truly, I say, weigh them with your kitchen scale; no guessing.) Mash lightly with a potato masher or pastry blender until you have a goopy strawberry soup of sorts, a thick liquid with small but distinct berry segments (These segments are rather toothsome when the jam is done, so, I say, think about that when you stop mashing and decide if the bits are small enough for you.)
Pour into a shallow dish (I poured it into two ceramic baking dishes so it was no more than 1-inch deep.) Cover with cheesecloth secured with rubber bands. (This is Texas, cover it with a double layer.) Set out in the sun for the day. Bring back inside and refrigerate overnight and repeat the following day. If you live in a warm, dry, sunny climate, you’ll probably have jam by the end of the second day without doing another thing (The Jamison’s live in N.M., so I’ll bet they do.) In a more humid or cloud-covered setting, it will likely take another full day of sitting out (and overnight refrigeration) to get the proper gelled texture, less thick than commercial versions, but with definite body. It will help speed the evaporation if you stir the jam a time or two during the day. If rain is anticipated, leave the jam in the refrigerator rather than putting it out. (We had rain at the end of the third day, but by then the jam was done. Sam brought it in.)
When the jam is ready, sterilize 2 half-pint (1-cup) canning jars. (I had enough jam to fill two-cup jars, as you can see). Spoon the jam in the jars, leaving about 1/4 inch of headspace and refrigerate for up to several weeks. Freeze for longer storage.
Credit: Jamison, Cheryl Alters and Jamison, Bill. “Real American Breakfast.” New York: William Morrow, p. 404
